CodeChic CLI
Easy way for deploy your docker image to Amazon Elastic Beanstalk with Codeship Pro


codechic-cli
Easy way for deploy your docker image to Amazon Elastic Beanstalk with Codeship Pro
Requirement
- AWS ACCOUNT ID
- AWS ACCESS KEY ID
- AWS SECRET ACCESS KEY
- AWS Application name
- AWS application enveronment name
- S3 bucket name
- AWS registry
- Codeship aes key
- dockerfile
- npm
Installation
npm install codechic -g
Process of Codeship Pro deploy your docker image to EB

How to use
1. Encrypt your AWS credential
-
Step first you must create env file (in anywhere).
Example: env
AWS_ACCOUNT_ID=xxxxxxxxxxxxxxx
AWS_ACCESS_KEY_ID=yyyyyyyyyyyyy
AWS_SECRET_ACCESS_KEY=aaaaaaaaaaaaaa
AWS_REGION=ur-region
-
Download Codeship AES Key
-
Install jet CLI. (Installing The Jet CLI)
-
Just encrypt file env with jet CLI.
See More
// Command:

$jet encrypt ${YOUR_ENV_FILE} ${OUTPUT_FILE_NAME}

// Example:

$jet encrypt env aws_credes.encrypted
2. Use codechic CLI
-
Run this command :
$cd {your-repository}
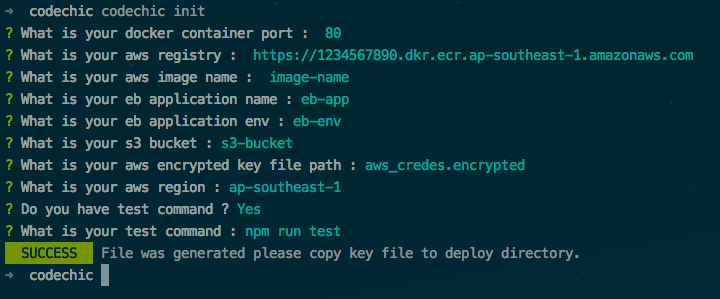
$codechic init
-
Fill your information on console.
1. Docker port
2. AWS registry url
3. Image name
4. EB application name
5. EB environment name
6. S3 bucket
7. Your encrypted file
8. AWS region
9. Do you have test command ? (y/N)
10. Your test command (optional)
-
You will receive file & directory for deployment.

3. Create your Dockerfile
- Move your DockerFile to your repository.
4. Copy file encrypted to
./deploy/${YOUR_FILE}
File structure
- my-project
  -/deploy
    -aws_deployment
    -Dockerrun.aws.json
    -aws_credes.encrypted
  -codeship-services.yml
  -codeship-steps.yml
  -Dockerfile
5. Push your code !!
⚠️ ️ BEWARE !!!
- Don't push your codeship.aes and your AWS credential file to git.
License
MIT
Developed with ❤️ and ☕️
